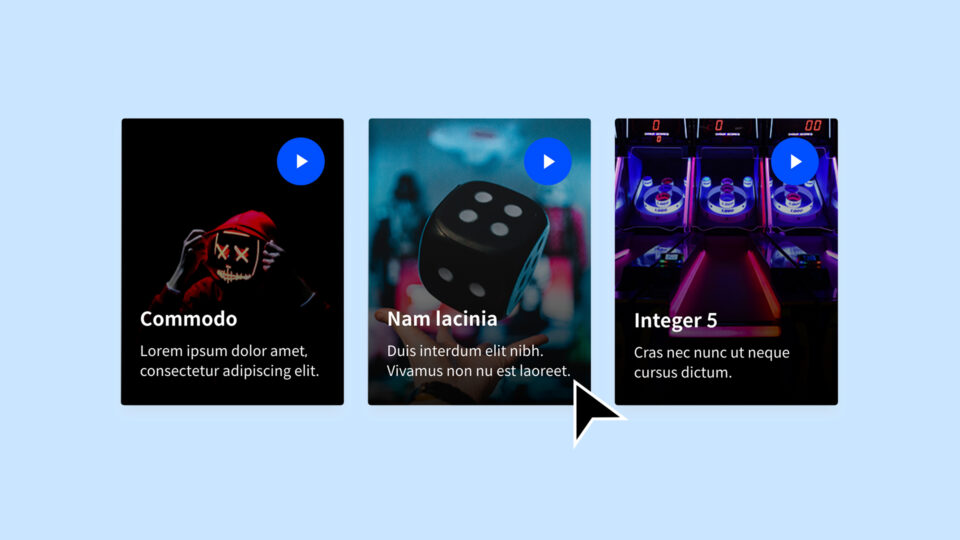

웹 디자이너를 위한 웹 코딩 강좌 일곱 번째 시간입니다. 오늘은 Card UI를 코드로 만들어보는 시간입니다. HTML과 CSS를 활용해서 어떻게 만드는지 예제를 통해 배워볼 수 있어요. 오늘 중점적으로 배워볼 개념은 Class와 ID입니다. 아주 중요하니까 꼭 알아가도록 해요 🙂 이 강좌에 나오는 개념 중 Position, Display, Z-index역시 중요하기때문에 다른 강좌에서 자세히 배울 예정입니다. 오늘은 맛보기라고 생각하고 Class, ID에 집중해보세요!
예제 파일 : https://drive.google.com/drive/folders/1nmggxp98OaGYDAZL32l5eanyQieGeEOf?usp=sharing
*디자인베이스 강좌는 Mac OS를 기준으로 해서 윈도우 사용자와 일부 차이가 있을 수 있습니다. 제가 사용하는 툴은 비주얼 스튜디오 코드(Visual Studio Code)를 사용하며 여러분이 다른 툴을 사용한다면 환경이 다를 수 있습니다. 하지만 언어는 똑같기 때문에 작업하는 데 문제는 전혀 없습니다.
핵심 요약
Id는 클래스와 비슷한 개념이지만, 약간 다릅니다.
클래스는 반이라고 생각하면 되고,
아이디는 고유의 정보! 주민등록증이라고 생각하면 됩니다.
디자인 고등학교를 다니는 학생은 디자인 고등학교 라는 클래스를 갖고,
디자인 고등학교 3학년 2반 15번 이수영은 딱 한명만 있죠! 그게 아이디입니다.
클래스는 여러군데 쓸 수 있지만,
단하나의 아이디는 한군데만 쓸수있습니다.
간단하죠?
코드로 다시말하면, 클래스는 공통으로 선택하고 스타일을 입히는 경우에 쓰이고,
아이디를 쓰는 경우는 다른 태그와의 확실한 차별을 가져야 하는 경우에 씁니다.
<div></div> <!-- Tag -->
<div class="design"></div> <!-- Class -->
<div id="base"></div> <!-- ID -->
/* tag */
div{
    background-color: green;
}
/* class */
.design{
	background-color: blue;
}
/* id */
#base{
	background-color: red;
}
클래스는 클래스명 앞에 .을 넣어줍니다.
아이디는 아이디명 앞에 #을 넣어줍니다.
HTML 코드
<!doctype html>
<html>
<head>
<meta charset="utf-8">
<meta name="viewport" content="width=device-width, initial-scale=1">
	<title>예제 - Class & ID</title>
	<link rel="stylesheet" href="css/style.css">
</head>
<body>
	<div class="container">
		<div class="card" id="pick">
			<div class="img-gradient"></div>
			<img src="img/sample-1.jpg" alt="" srcset="">
			<div class="text-wrap">
				<h1>Commondo</h1>
				<p>Lorem ipsum dolor amet, consectetur adipiscing elit.</p>
			</div>
			<div class="play-button"></div>
		</div>

		<div class="card">
			<div class="img-gradient"></div>
			<img src="img/sample-2.jpg" alt="" srcset="">
			<div class="text-wrap">
				<h1>Nam lacinia</h1>
				<p>Duis interdum elit nibh. Vivamus non nu est laoreet. </p>
			</div>
			<div class="play-button"></div>
		</div>

		<div class="card">
			<div class="img-gradient"></div>
			<img src="img/sample-3.jpg" alt="" srcset="">
			<div class="text-wrap">
				<h1>Integer 5</h1>
				<p>Cras nec nunc ut neque cursus dictum.</p>
			</div>
			<div class="play-button"></div>
		</div>

	</div>
</body>
</html>
CSS 코드
.container{
	text-align: center;
	margin-top:200px;
}
.card{
	transition: 0.3s;
	position: relative;
	border-radius: 8px;
	width:100%;
	max-width: 280px;
	overflow: hidden;
	display: inline-block;
	margin:10px;
	box-shadow: 0 20px 35px rgba(0,0,0,0.3);
	transform: scale(1);
}
.card:hover{
	transform: scale(0.95);
}
.img-gradient{
	position: absolute;
	width:100%;
	height: 100%;
	bottom:0;
	background: linear-gradient(rgba(0,0,0,0), rgba(0,0,0,1));
	z-index: 1;
}
.text-wrap{
	position: absolute;
	bottom:0;
	z-index: 10;
	padding:24px;
	text-align: left;
}
.text-wrap h1{
	font-size: 24px;
	font-weight: bold;
	margin-bottom:8px;
	color:#fff;
}
.text-wrap p{
	color:#fff;
	line-height: 1.5;
}
.play-button{
	position: absolute;
	right:24px;
	top:24px;
	width:60px;
	height: 60px;
	border-radius: 50%;
	background: #004fff url(../img/icon-play.png) center no-repeat;
	background-size: 20px;
	z-index: 2;
}



아직 댓글이 없습니다.
로그인 후 댓글을 작성할 수 있습니다.